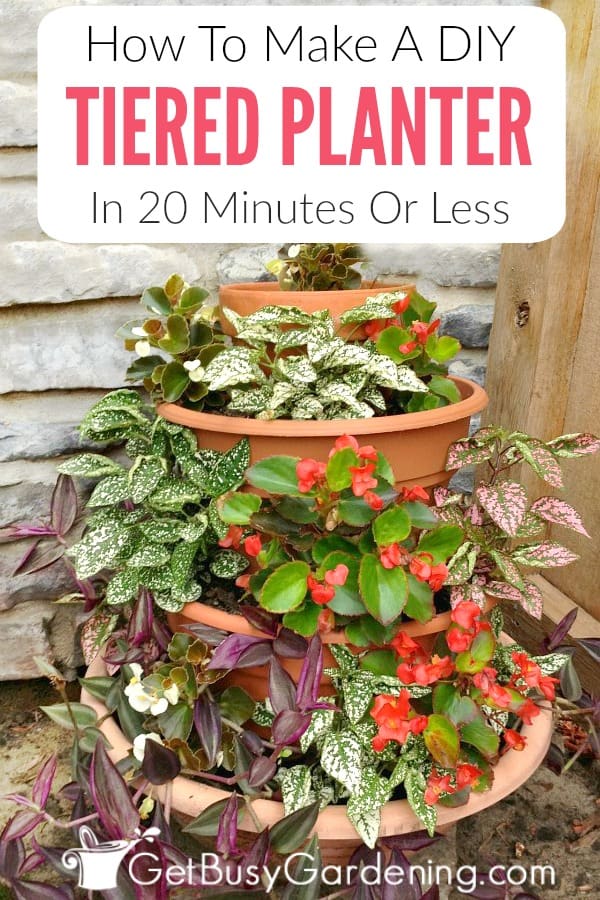
Tiered outdoor planters are wonderful for adding height to your garden, and an easy way to try your hand at container vertical gardening. Making your own tiered flower pots vertical planter is fun and easy! In this post, I will show you how to make a tiered planter, step by step. You’re gonna love it!

![]()
Not only does it look amazing, but a stacked pot tiered planter like this one is a wonderful way to grow vertically! It takes up less space, and you can grow more plants! Perfect for the deck or patio, and a great way to get started with vertical gardening.
This project is ridiculously easy, and can be done almost for free if you have a lot of plant pots sitting around like I do.
It took me less than 20 minutes to complete this project, and that includes the time it took for me to find the perfect garden pots in the garage.
Related Post: 15 Types Of Vertical Gardening Systems & Supports
How To Make A Tiered Planter
Before getting started, choose a location that is level for your planter. Then plan to build the planter right on that spot, rather than building it somewhere else and trying to move it. It will be heavy and difficult to move once you have it completed.
Supplies Needed
- Three or four stackable planters. Each flower pot should be smaller than the one below it, allowing enough room for the plants to grow. All of them should have drainage holes on the bottom.
- Container gardening soil
- Level (optional)
- Plants

Garden plant pots used for multi tier planter
Step 1: Level the base container for your tiered planter – You want to make sure that the bottom pot is completely level so that your DIY tiered planter will sit level and won’t topple over. So place the largest pot on a level service, and use a level to make sure it’s not leaning to one side.
To make it easier to level my planter, I put a flat stepping stone down first and leveled that. Once you’ve leveled the bottom pot, fill it with dirt.
Related Post: Choosing The Best Potting Soil Mix For Container Gardening

Ensure planter base is level before stacking pots
Step 2: Stack the next largest flower pot on top of the pot below it – Fill the next largest pot with dirt and then place it on top in the center of the one you just put down. Press the pot into the soil a bit to stabilize and level it.
I buried about a 1/4 of each pot into the soil of the pot beneath it to give it more stability. If you want it even more stable, you can bury it deeper. Once you’ve placed the second pot, check to be sure it’s level too.
Continue centering, leveling, filling and stacking the smaller pots on top of each other until you have your multi tiered planter completed.
Step 3: Plant it! – Now comes the fun part, planting your tiered pots! Be sure to select potted plants that will thrive in the sun exposure of the area where you built your planter. You can use your tiered outdoor planters to grow flowers, herbs or vegetables.
Mine is in full shade, so I filled my planter with flowering begonias, polka dot plants and wandering jews – all colorful shade loving plants.
Related Post: How To Design Stunning Container Gardens

Add plants to your multi tiered planter
One thing to note: My planter is in a protected corner where it won’t be affected by wind or severe weather.
If you plan to put your tiered flower pots in an open area, I would recommend using ceramic or terracotta pots that are heavier, rather than ones made out of a lightweight material like plastic plant pots.
Add even more character to your containers with paint! Here’s how to paint terracotta pots.
If you want to use plastic pots, you could put rocks in the bottom of each pot to add more weight. This will help ensure your tiered pots won’t tumble over in a strong wind.

Plants growing in my DIY tiered planter
This project allows you to be creative; mix and match pots with bright colors to create a pop of color in the garden. Each flower pot could be the same style, or use pots with different textures to create visual interest.
You could make a couple of them and put them around the yard, or use them as porch or deck planters. Each one could be completely different, or they could be the same. The possibilities for tiered planter ideas are endless.
Oh, and you don’t need to use four pots like I did, you could create a 3-tier flower planter instead if you want, but I wouldn’t go more than four or five pots high, or the planter might get too top heavy.

My tiered planter filled in with plants
The thing I like the most about my new corner planter is that all the pots are different, making it totally unique.
I love the height this easy vertical planter adds to the boring corner of my yard. I plan to make one for my deck next, and maybe a couple for my front porch!
What a fun way to put all those pots I have in storage to use every year. Now all that’s left is to brag to your friends about how you built this cool tiered planter for practically free! Up next, find the perfect container plants to use here.
Interested in taking your vertical gardening knowledge to the next level and grow vegetables vertically? Well then my brand new book, Vertical Vegetables: Simple Projects That Deliver More Yield In Less Space is perfect for you! It will teach you about vertical gardening techniques, care and design, plus there are tons of fun and unique step-by-step projects that will keep you busy! Order your copy today!
Learn more about my Vertical Vegetables book here.
More DIY Projects You Might Like
- How To Make A Concrete Block Planter
- A Cheap Alternative To Coconut Liners For Wire Planters
- How To Install A DIY Drip Irrigation System For Potted Plants
- How To Plant A Mum In A Pumpkin Step By Step
- How To Preserve A Carved Pumpkin & Tips To Make It Last Longer
Have you made a DIY tiered planter yet? Share you experience in the comments section below.
![]()

Karen Woolner says
Would love to do one with herbs
Amy Andrychowicz says
Herbs would be perfect for this tiered planter!
Christina says
Great idea! I have so many extra pots and planters of various sizes laying around that making one or more of these should be fairly easy. Think it would work great on the patio for flowers and herbs. Excited to get it started!
Amy Andrychowicz says
Awesome, have fun!
Nancy says
I love this idea! I am anxious to put one together tomorrow. Have a great day!
Amy Andrychowicz says
Yeah! Glad you love the tiered planter! Have fun building your own. 🙂
Katherine Rose says
Wow! The tiered planter looks great all grown in!!
Amy Andrychowicz says
Yes, I’m very happy with how well my tiered planter has filled in! Thanks!
Roberta Kelly says
You might run a length of rebar or something like that down the middle of the whole thing and into the ground for extra stability…
Amy Andrychowicz says
Great idea Roberta, thanks for sharing!